How to fix a blurry or Pixelated Mouse Cursor on High-DPI Displays in Windows
July 9, 2025

Are you noticing that your mouse cursor appears blurry or pixelated when using a high-DPI display with scaling set to 150%, 200%, or higher in Windows?
This common issue arises from how Windows handles display scaling. When you set your display scaling to 150%, 200%, or higher to make text and apps more readable, Windows often enlarges the standard-sized cursor (typically 32px or 48px) instead of using a higher-resolution version. This upscaling process can result in a loss of sharpness, making the cursor appear fuzzy and out of place on an otherwise crisp display, even though cursor files include sizes up to 128px.
You can check which cursor size is your monitor using with this free .cur: Cursor Size Checker
Fortunately, there's a quick fix. By making a small adjustment in the Windows Registry, you can force Windows to render the cursor at a more appropriate size, resulting in a significantly sharper and cleaner pointer.
Important Disclaimer: Back Up Your Registry First!
This guide involves editing the Windows Registry. The Registry is a critical database for your operating system, and incorrect changes can cause system instability. Before you proceed, please take a moment to back up your registry.
To back up the registry:
- Open the Registry Editor (as shown in Step 1 below).
- Click File > Export.
- Choose a safe location, give the file a name (e.g., "RegistryBackup_Date"), ensure "Export range" is set to All, and click Save.
If anything goes wrong, you can restore this backup by opening the Registry Editor and going to File > Import.
Step-by-Step Guide to Sharpening Your Cursor
Follow these instructions carefully to adjust your cursor's base size.
Step 1: Open the Registry Editor
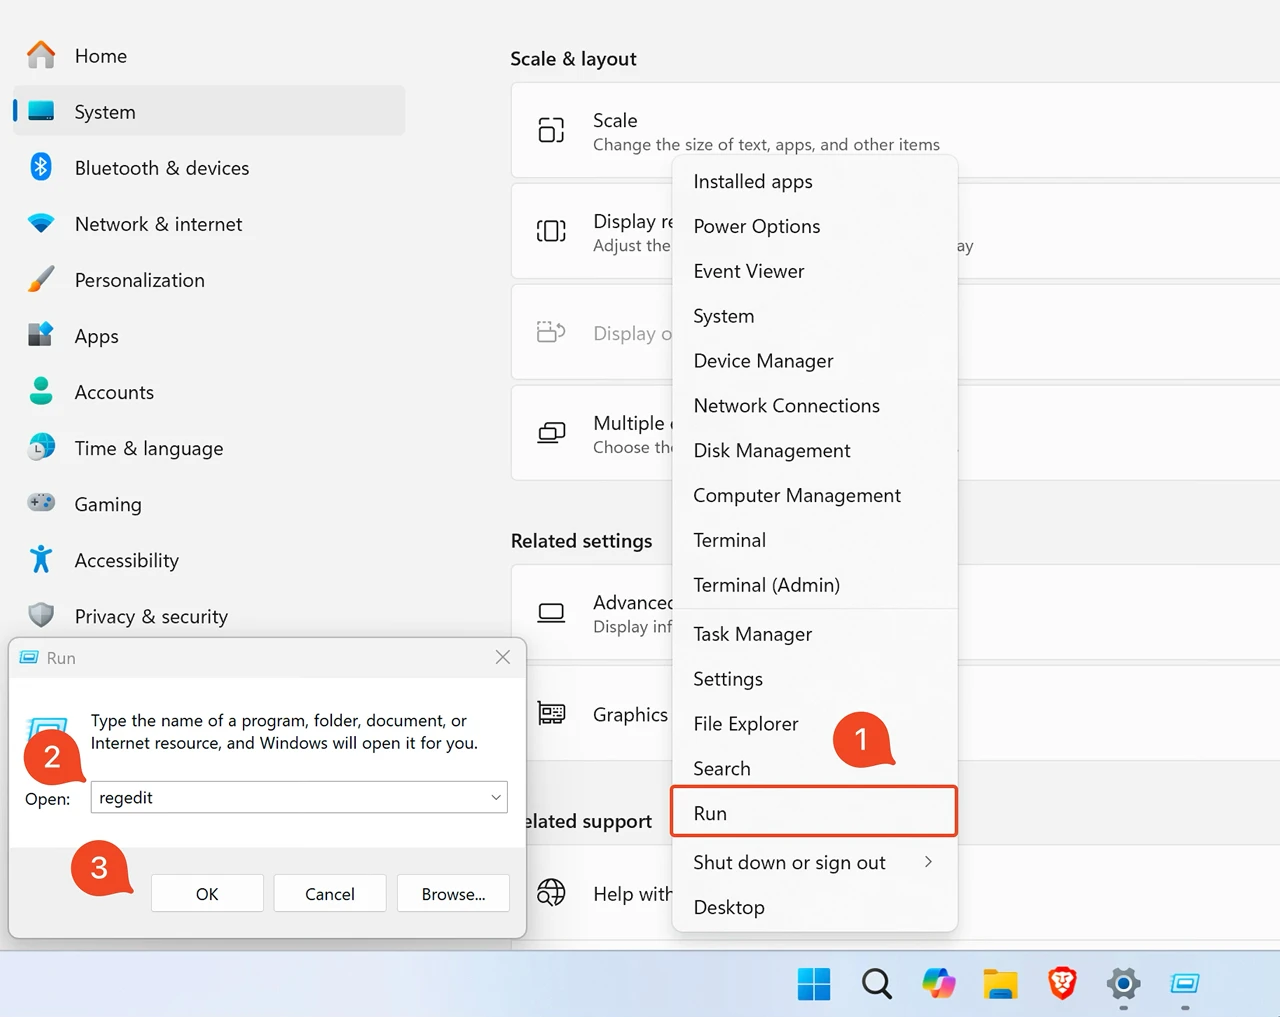
First, you need to open the Registry Editor. The quickest way is using the Run command.
- Press the Windows Key + R on your keyboard to open the Run dialog.
- In the "Open" field, type
regeditand click OK or press Enter. - A User Account Control (UAC) window will pop up asking for permission. Click Yes to continue.
Step 2: Navigate to the Cursors Key
In the Registry Editor window, you'll see a folder structure on the left. You can either navigate manually or use the address bar at the top for a much faster method.
Copy and paste the following path into the Registry Editor's address bar and press Enter:
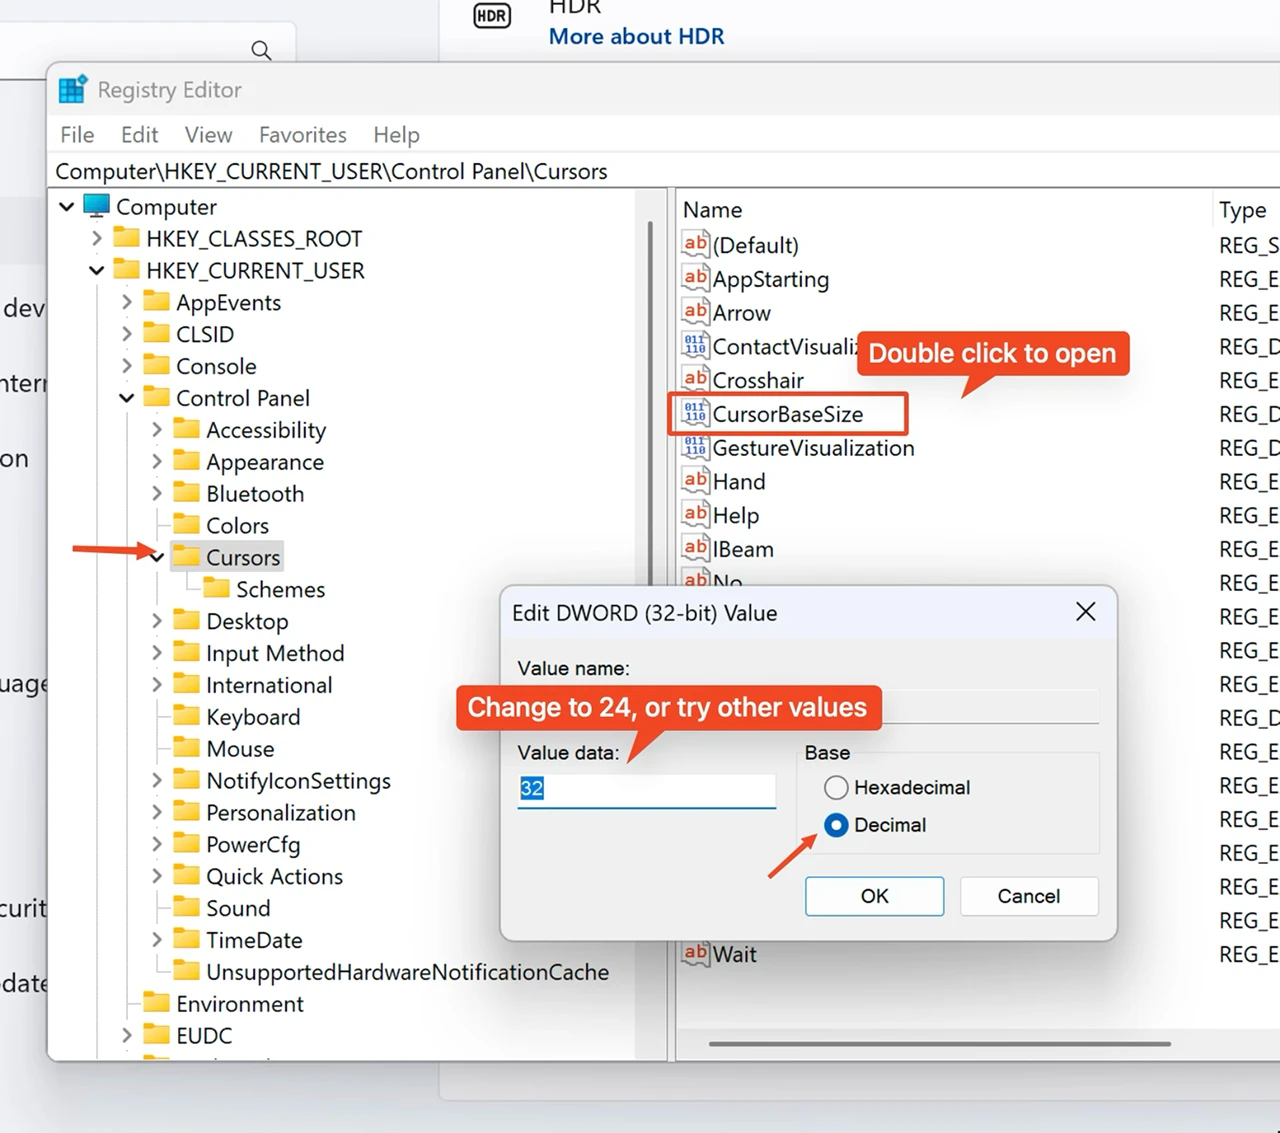
Computer\HKEY_CURRENT_USER\Control Panel\Cursors
Step 3: Modify the CursorBaseSize Value
In the right-hand pane, you will see a list of values. Find the one named CursorBaseSize and double-click it to open the editor window.
Step 4: Change the Value Data
In the "Edit DWORD (32-bit) Value" window, you need to make two changes:
- Change the Base: Select the Decimal radio button.
- Change the Value: The default value is typically 32. To fix the blurriness, you need to enter a smaller number. A value of 24 is an excellent starting point.
Click OK to save your change.
Step 5: Apply the Changes
The changes won't take effect immediately. You must sign out of your Windows account and sign back in, or simply reboot your computer.
Once you log back in, your mouse cursor should appear slightly smaller but noticeably sharper and more defined.
Don't Like the Change? How to Revert
If you find the new cursor too small or wish to revert to the default setting, the process is simple:
- Follow Steps 1-3 to navigate back to the
CursorBaseSizevalue in the Registry Editor. - Double-click it, select Decimal, and change the value back to 32.
- Click OK and sign out/reboot your PC.
Your cursor will return to its original state. You can experiment with other values (like 28 or 20) to find the perfect size for your preference and display setup.